


A crepe bandage is one of the most useful first aid items to keep at home, in the workplace, or in a sports kit. It can provide gentle compression, help support an injured area, and hold dressings in place.
However, the way you wrap a crepe bandage depends on where the injury is. Using the correct technique may help the bandage stay secure and provide even support.
This guide explains common ways to apply a crepe bandage for different body parts. It is intended as a general first aid guide and does not replace medical advice. If an injury is severe or pain continues, seek assessment from a healthcare professional.
What Is a Crepe Bandage?
A crepe bandage is a soft, stretchable bandage made from woven cotton or similar materials. Unlike adhesive tape, it wraps around the body without sticking to the skin.
Crepe bandages are commonly used to:
- Provide light compression
- Support muscles and joints
- Help reduce swelling as part of first aid
- Hold wound dressings in place
- Secure cold packs
- Support recovery after minor sprains and strains
According to first aid guidance, compression is one part of managing many soft tissue injuries.
Before You Start
Before applying a crepe bandage:
- Wash your hands if possible.
- Clean and cover any open wound with an appropriate dressing.
- Remove jewellery near the injured area.
- Position the injured limb comfortably.
- Ensure the bandage is clean and undamaged.
Always wrap firmly but not tightly.
If fingers or toes become cold, numb, blue, pale, or swollen after applying the bandage, remove it and reapply with less tension.
General Rules for Wrapping a Crepe Bandage
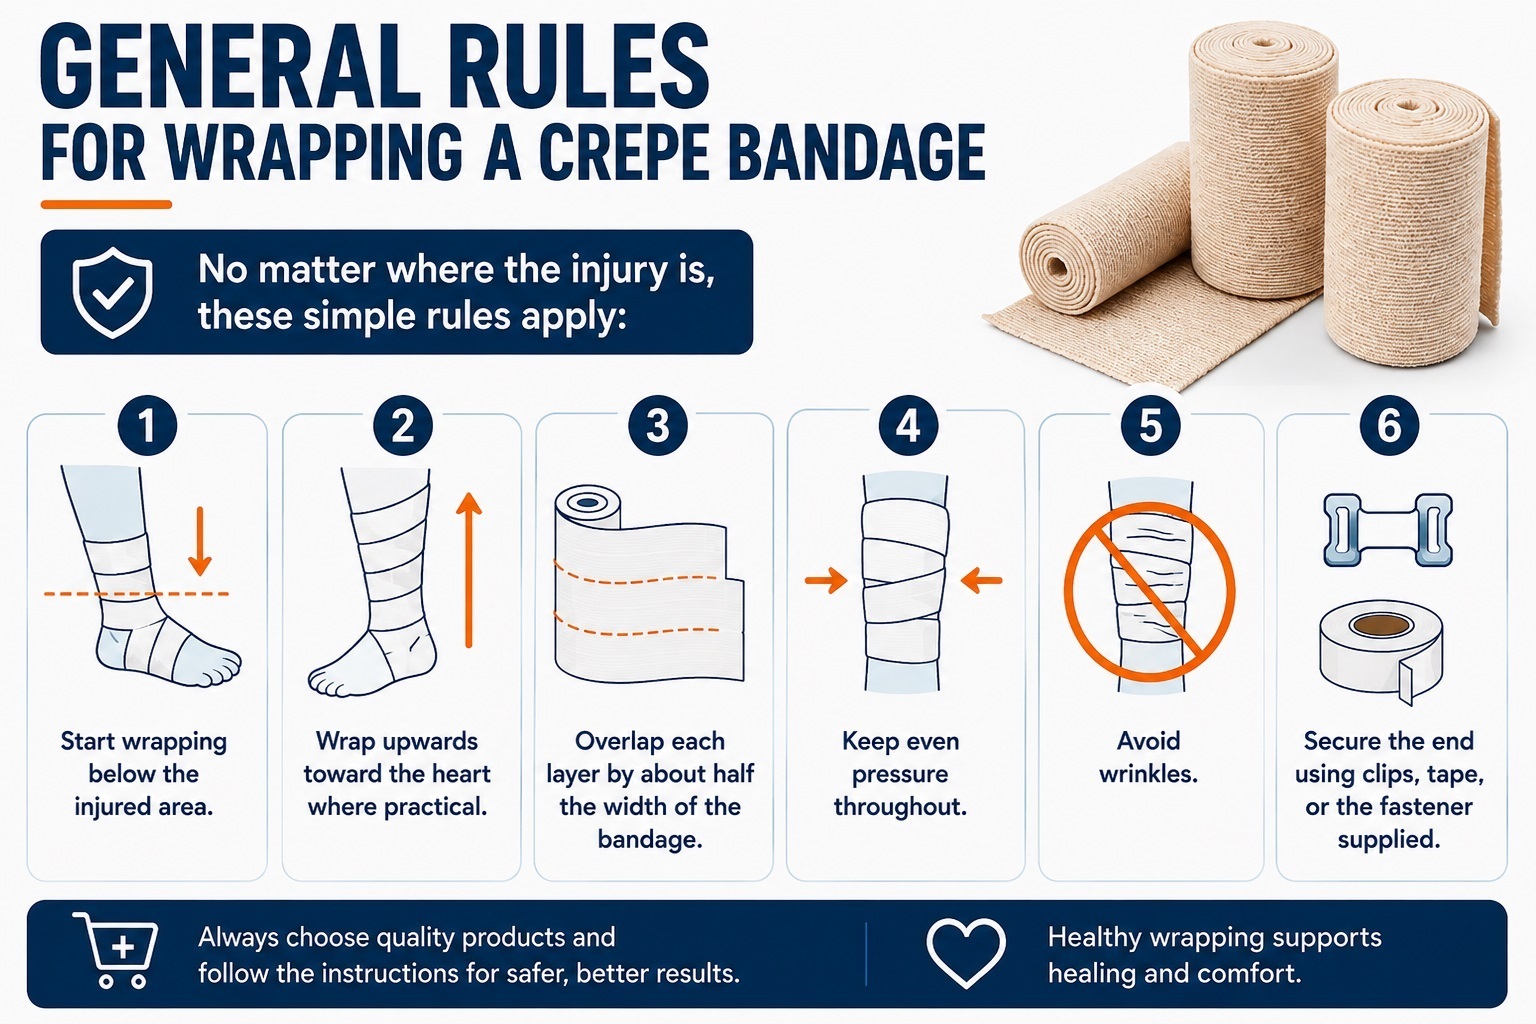
No matter where the injury is, these simple rules apply:
- ✔ Start wrapping below the injured area.
- ✔ Wrap upwards toward the heart where practical.
- ✔ Overlap each layer by about half the width of the bandage.
- ✔ Keep even pressure throughout.
- ✔ Avoid wrinkles.
- ✔ Secure the end using clips, tape, or the fastener supplied.
How to Wrap an Ankle
Best For
- Mild ankle sprains
- Minor strains
- Compression after activity
Steps
- Begin wrapping around the middle of the foot.
- Wrap underneath the arch.
- Continue around the heel.
- Wrap in a figure-eight pattern around the ankle.
- Continue several turns above the ankle.
- Secure the bandage.
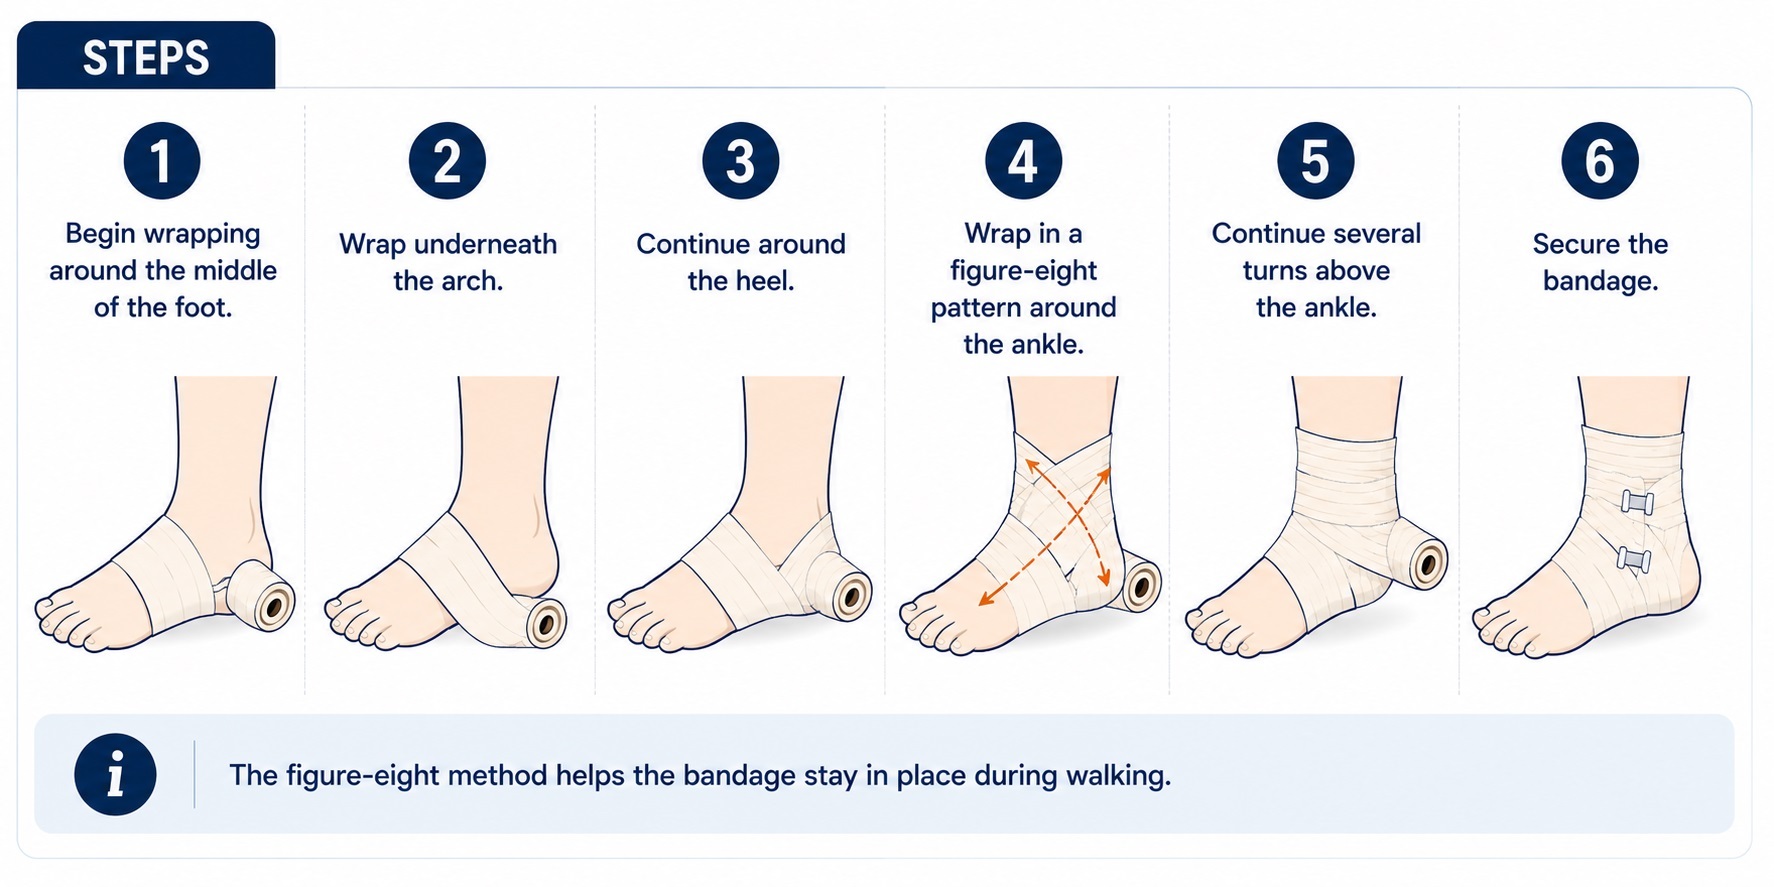
The figure-eight method helps the bandage stay in place during walking.
How to Wrap a Wrist
Best For
- Mild wrist sprains
- Wrist support
- Holding a dressing
Steps
- Start just above the wrist.
- Wrap around the wrist twice.
- Continue diagonally across the back of the hand.
- Wrap around the palm while leaving the fingers free.
- Return around the wrist.
- Repeat until secure.
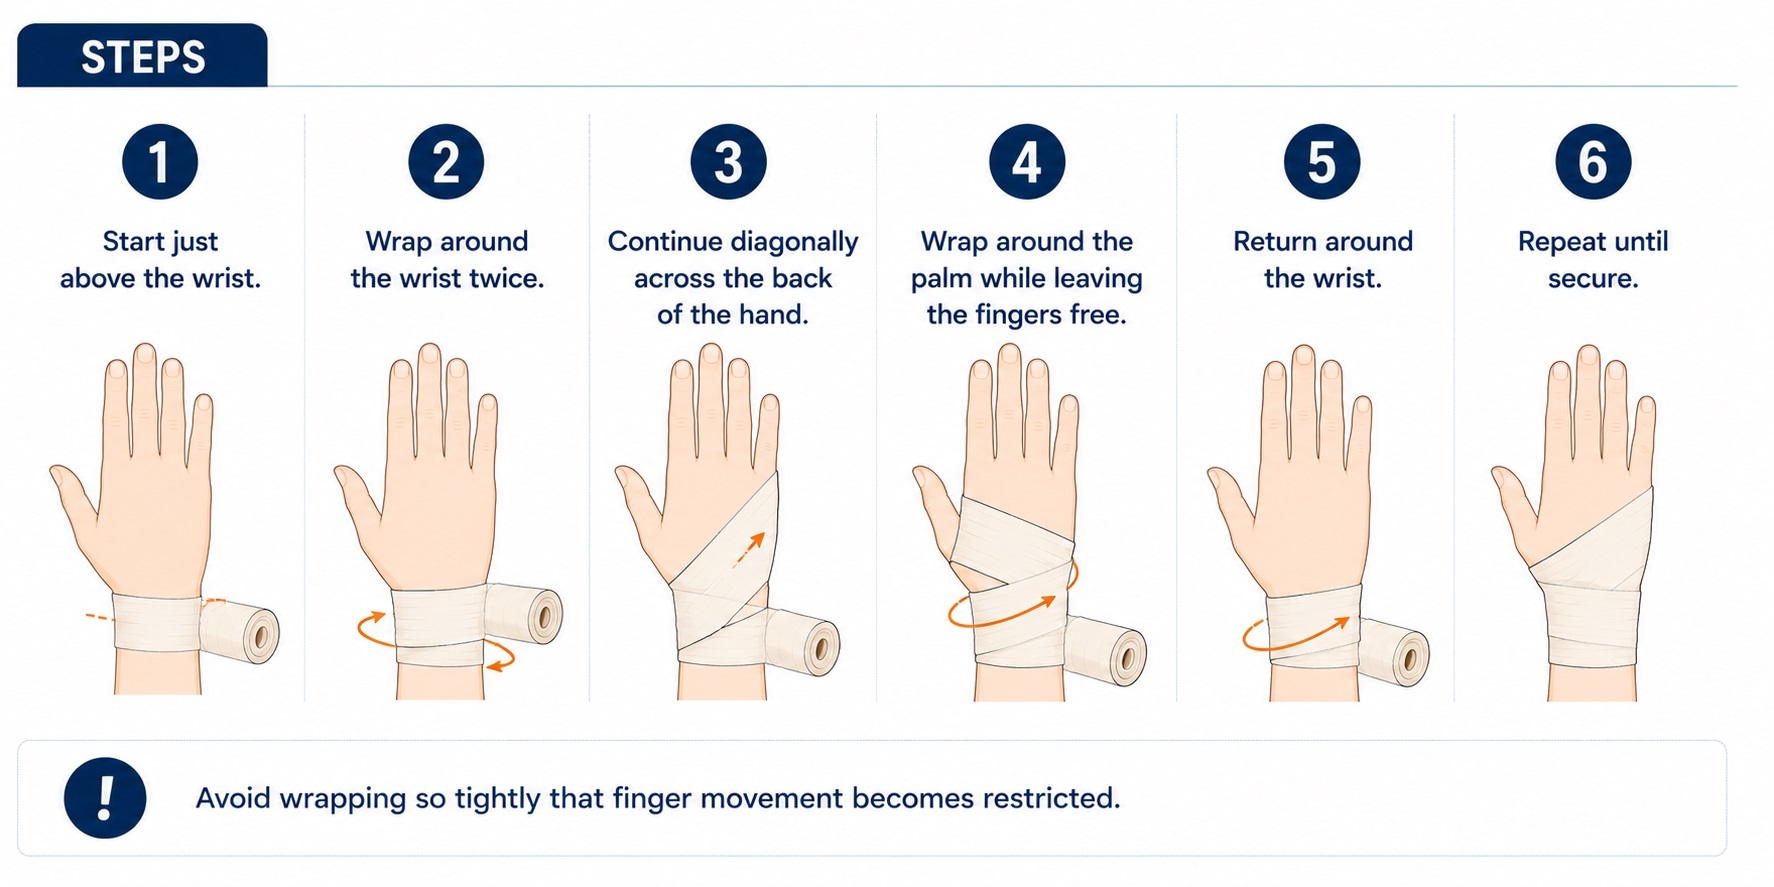
Avoid wrapping so tightly that finger movement becomes restricted.
How to Wrap a Knee
Best For
- Mild strains
- Swelling
- Joint support
Steps
- Bend the knee slightly.
- Start below the knee.
- Wrap upward using overlapping turns.
- Cross diagonally over the kneecap.
- Continue above the knee.
- Secure the bandage.
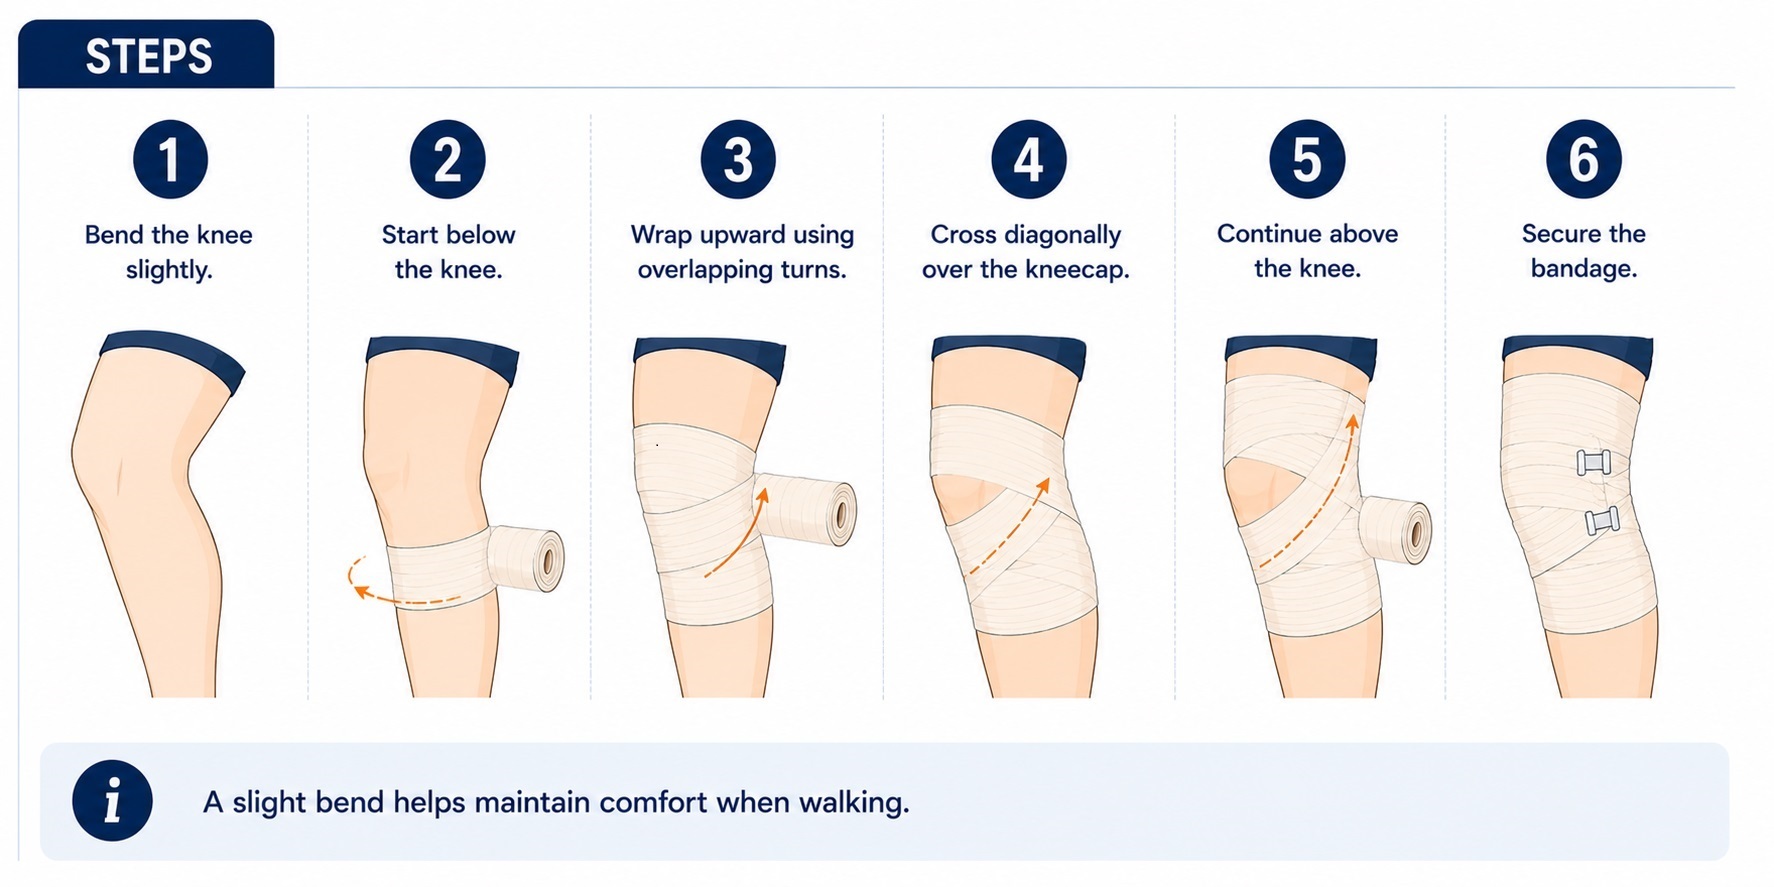
A slight bend helps maintain comfort when walking.
How to Wrap an Elbow
Best For
- Minor strains
- Light compression
- Support after activity
Steps
- Bend the elbow about 90 degrees.
- Start below the elbow.
- Wrap upward.
- Use a figure-eight pattern around the joint.
- Finish above the elbow.
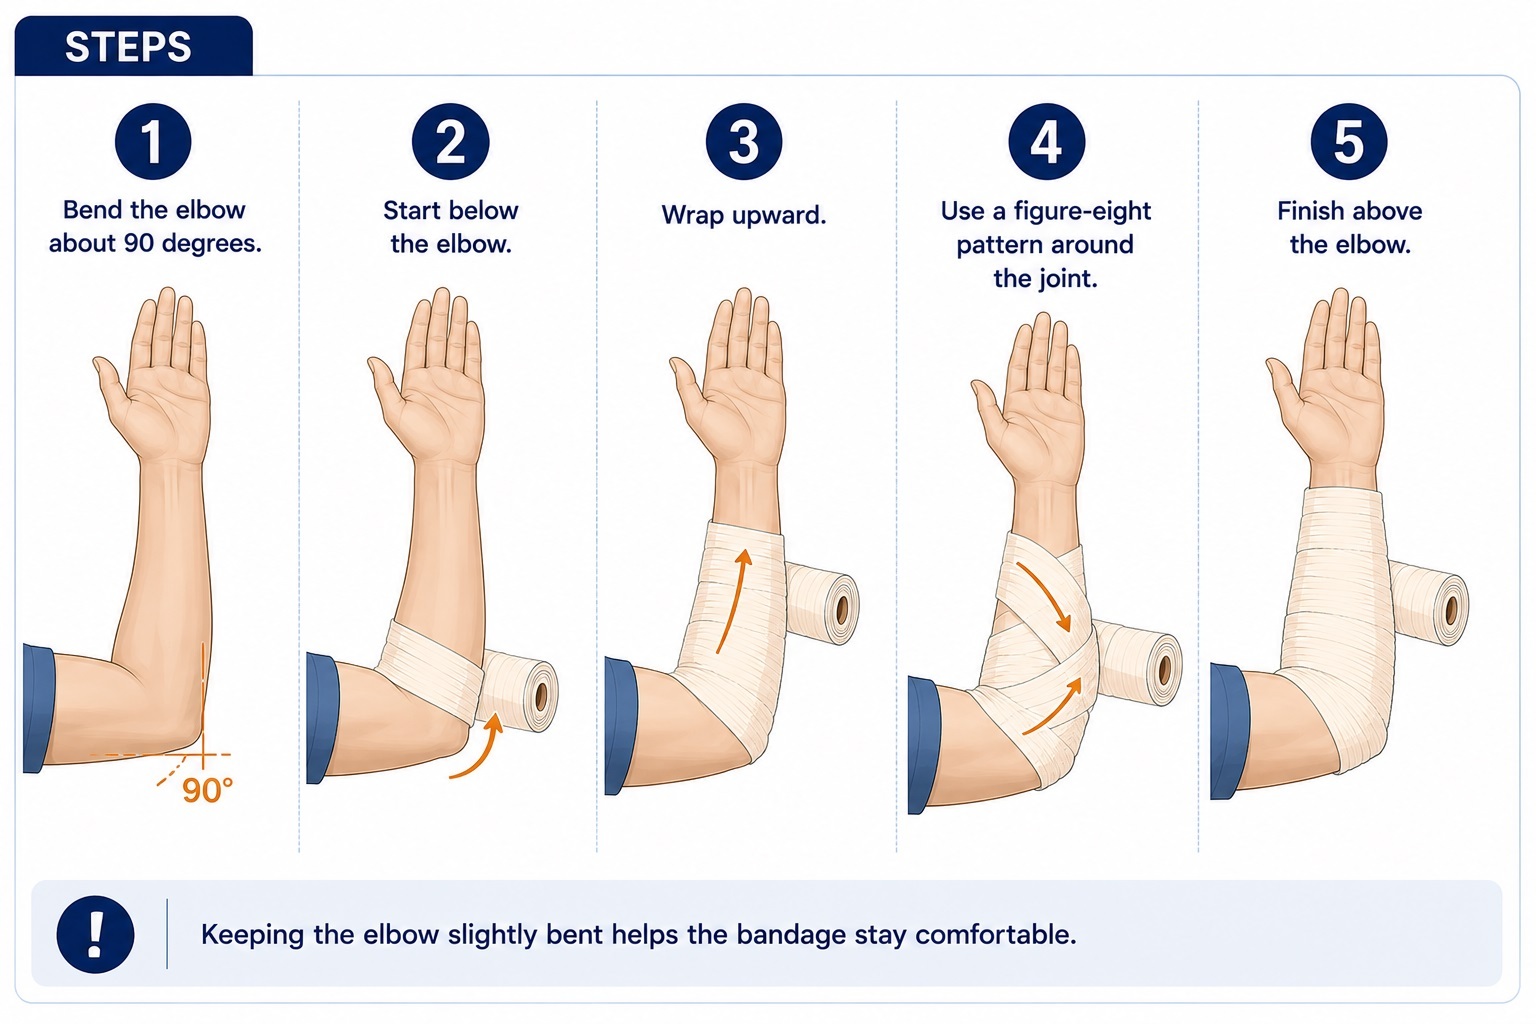
Keeping the elbow slightly bent helps the bandage stay comfortable.
How to Wrap a Hand
Best For
- Holding dressings
- Mild swelling
- Soft tissue support
Steps
- Begin around the wrist.
- Wrap across the back of the hand.
- Pass around the palm while leaving the thumb free unless instructed otherwise.
- Continue back to the wrist.
- Repeat until secure.
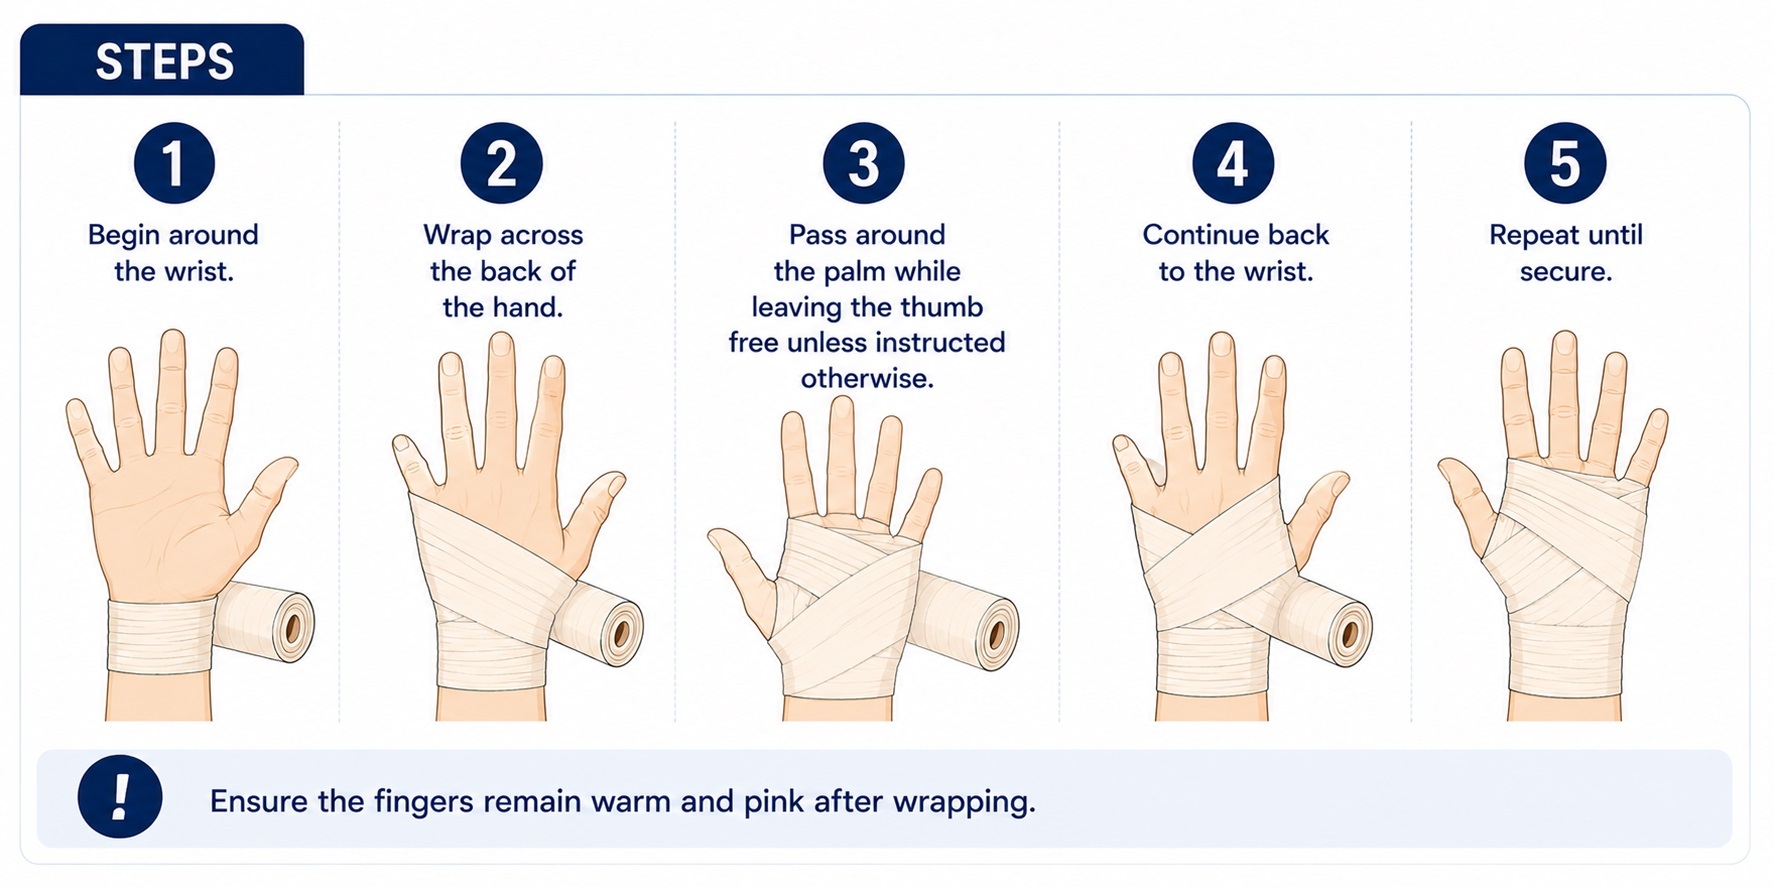
Ensure the fingers remain warm and pink after wrapping.
How to Wrap a Foot
Best For
- Minor swelling
- Mid-foot support
- Dressing retention
Steps
- Start near the toes, leaving them visible.
- Wrap toward the ankle.
- Cover the arch.
- Continue around the heel if needed.
- Finish above the ankle.
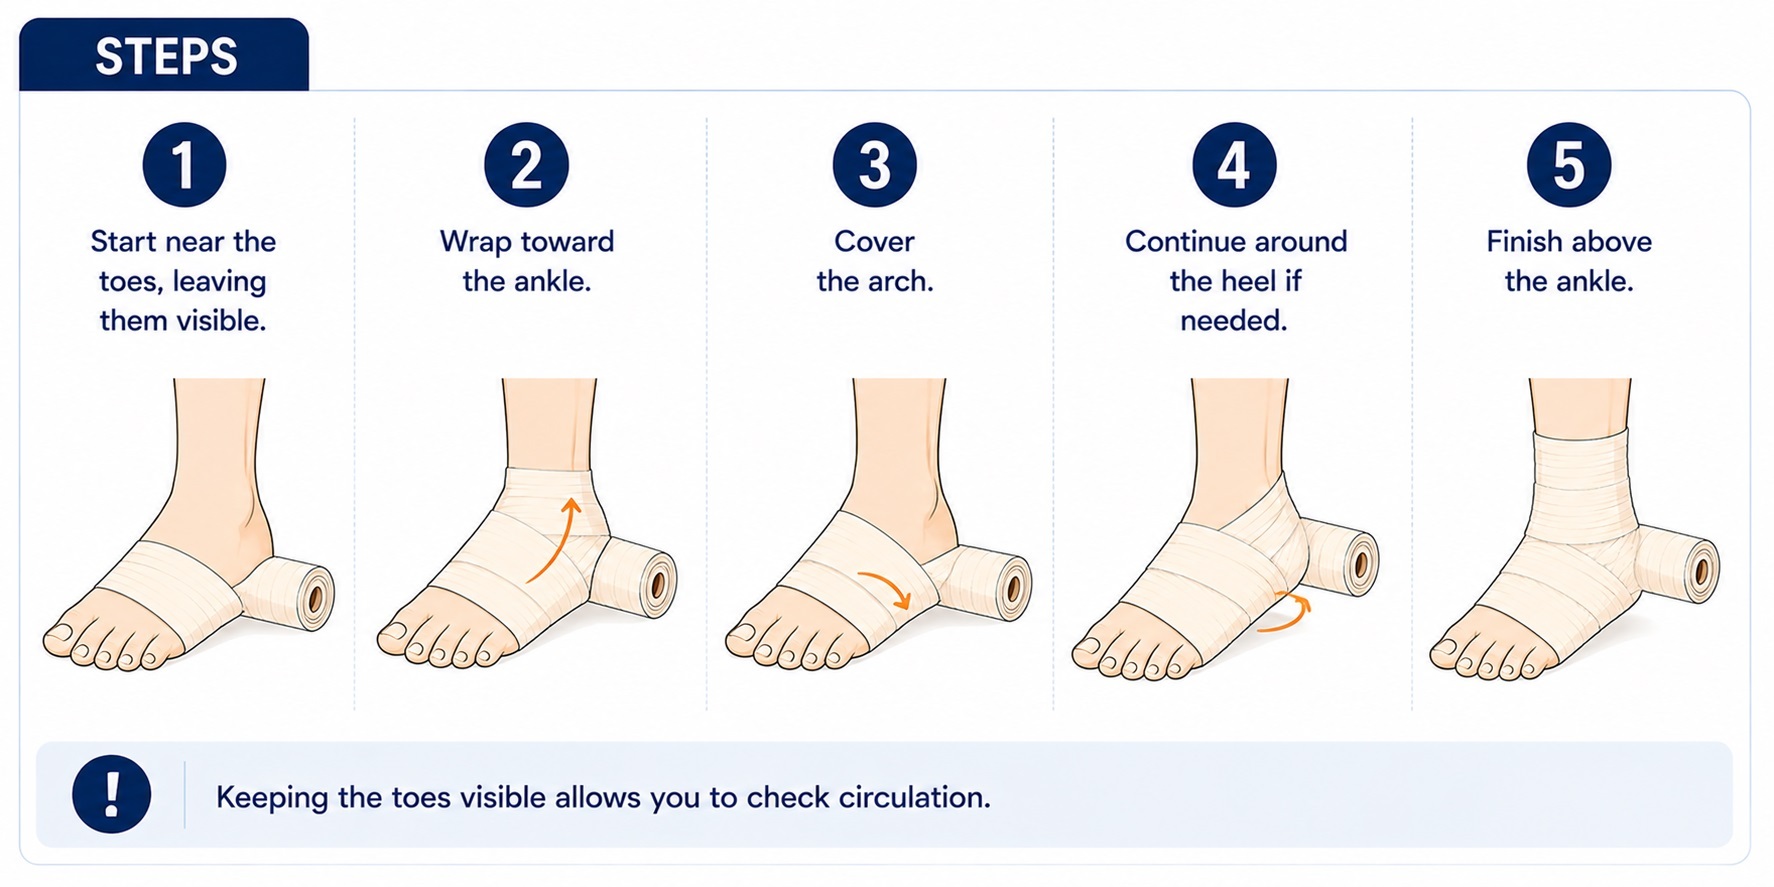
Keeping the toes visible allows you to check circulation.
How to Wrap a Calf
Best For
- Muscle support
- Compression for mild swelling
Steps
- Begin above the ankle.
- Wrap upward toward the knee.
- Overlap each layer evenly.
- Stop just below the knee.
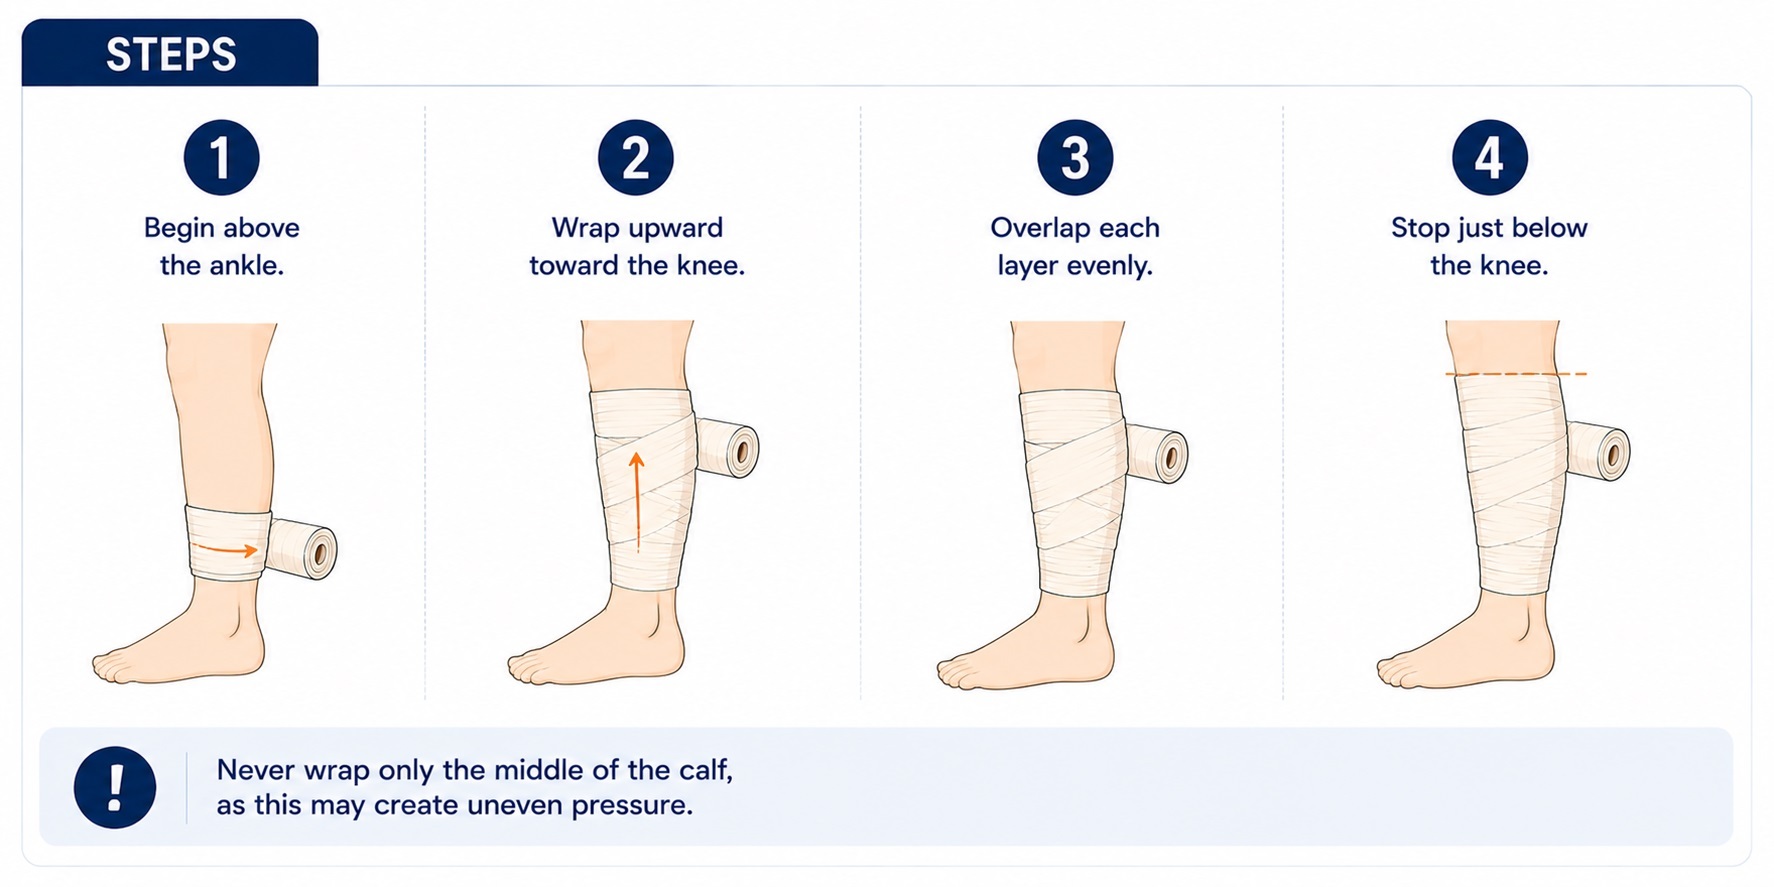
Never wrap only the middle of the calf, as this may create uneven pressure.
How to Wrap a Thigh
Best For
- Muscle strains
- Compression support
Steps
- Start just above the knee.
- Wrap upward.
- Continue toward the upper thigh.
- Secure comfortably.
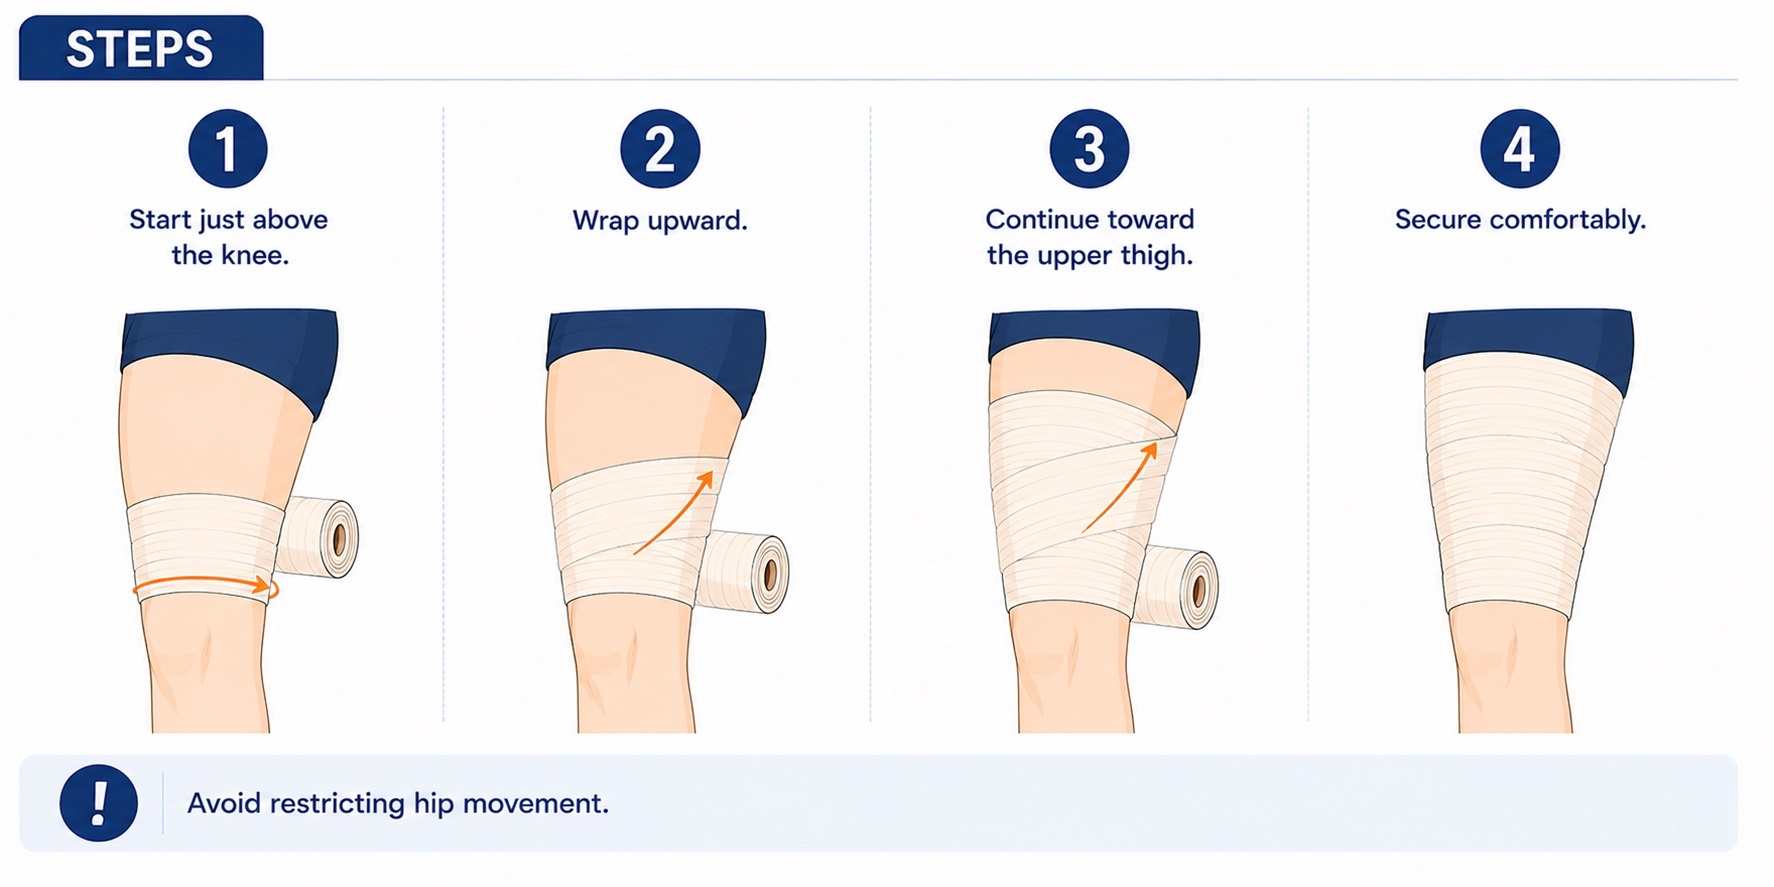
Avoid restricting hip movement.
Common Wrapping Patterns
Spiral Wrap
Best for:
- Arms
- Legs
- Calves
- Thighs
This is the simplest wrapping technique.
Figure-Eight Wrap
Best for:
- Ankles
- Wrists
- Elbows
- Knees
This pattern follows the shape of joints and helps keep the bandage from slipping.
Recurrent Wrap
Best for:
- Fingers
- Toes
- Hands
This technique is often used by healthcare professionals when covering the ends of limbs.
How Tight Should a Crepe Bandage Be?
A crepe bandage should feel snug but comfortable.
After applying it, check that:
- Fingers or toes remain warm.
- Skin colour stays normal.
- You can still move the limb.
- There is no tingling or numbness.
- Pain does not increase.
If any of these occur, loosen or remove the bandage.
Common Mistakes to Avoid
Avoid these common errors:
- Wrapping too tightly
- Wrapping only over the injured area
- Leaving wrinkles in the bandage
- Covering fingers or toes when monitoring circulation is important
- Wearing the bandage continuously without checking the skin
- Using a damaged or stretched-out bandage
When to Seek Medical Advice
Seek medical attention if:
- Pain is severe.
- The joint looks deformed.
- You cannot bear weight.
- There is significant swelling or bruising.
- There is heavy bleeding.
- Numbness or loss of movement develops.
- Symptoms do not improve.
A crepe bandage provides support but does not treat broken bones or serious injuries.
Frequently Asked Questions
Can I sleep with a crepe bandage on?
Unless advised by a healthcare professional, many first aid guidelines recommend removing compression bandages before sleeping to help monitor circulation and comfort.
How long should I wear a crepe bandage?
This depends on the injury and advice from your healthcare provider. For minor injuries, people often use a crepe bandage during the day while remaining active and remove it for skin checks or as instructed.
Can I reuse a crepe bandage?
Yes. Most reusable crepe bandages can be washed according to the manufacturer's instructions. Replace the bandage if it becomes stretched, damaged, or loses elasticity.
Can a crepe bandage help reduce swelling?
Compression is commonly included as part of first aid for some soft tissue injuries and may help manage swelling when used appropriately alongside other recommended measures.
Where to Buy Crepe Bandages
Whether you're building a home first aid kit, preparing for sports activities, or stocking a workplace medical cabinet, having a quality crepe bandage on hand is always a good idea.
Browse Crepe Bandages , First Aid Supplies , Sports Injury Supports , and Compression Bandages available through MedCart Australia. With products from trusted healthcare brands, MedCart makes it easy to find first aid essentials for home, work, schools, clinics, and aged care facilities.
References
- Australian Red Cross – First Aid Guidance
- Better Health Channel (Victorian Government) – Sprains and Strains
- St John Ambulance Australia – First Aid Advice
- Healthdirect Australia – Sprains and Strains
- Australian Commission on Safety and Quality in Health Care – Wound Care Resources